Understanding Arecont Vision Bit Rate Control Settings
Understanding Arecont Vision's Bit Rate Control Settings
Controlling camera bitrate is a desirable function in many network environments. With any method of compression camera bitrate in low light will increase as a result of image noise. With higher resolution cameras as pixel size decreases this effect is more pronounced as a result of signal to noise ratio reduction. Providing infrared or visible light illuminators as part of your system design will help offset this increase. Bit rate control is a feature available on Arecont Vision cameras that helps manage bit rate. The bit rate control settings can be found in the H.264 menu of our current model single sensor cameras. For the Panoramic cameras these settings are not available in the camera user interface. These models will support constant bit rate control, but the parameter needs to be set in the H.264 stream request made by the VMS making the request.
There are 2 setting options available for our Bit Rate control, variable and constant.
Variable bit rate control allows setting of the H.264 image quality level. When configured the selected image quality level will be maintained, but bit rate will be ignored.
There is an option under this called “Enable Rate Limit” which if selected allows this mode to behave like our constant bit rate control option if the bit rate rises above the user defined limit.
If this option is selected the camera will automatically increase image compression if the bit rate rises above the limit set. If the bit rate remains below the defined limit the camera will maintain the user defined H.264 image quality set.
Constant bit rate control maintains the camera bit rate at a user defined level.
When this mode is selected the camera will automatically apply image compression to keep bit rate at the set level. With rate limit, image quality will change as compression is automatically adjusted by the camera as to keep bit rate at the defined level.
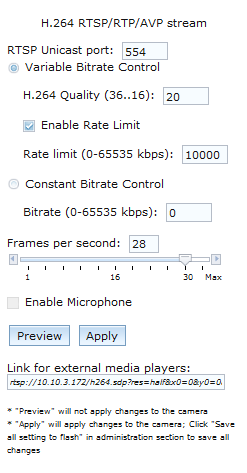
Setting up bit rate control for our current generation single sensor cameras:
Note: Constant bit rate control features automatically adjust image compression to keep the bit rate output of the camera at the rate level set by the user. For constant bit rate control if the bit rate value is configured to a very low value this would cause the camera to automatically increase compression to maintain the bit rate at the configured limit. In this situation image quality will be affected as compression automatically increases or decreases.
Variable Bitrate Control when this radio button is selected the camera will maintain the Quality setting configured. There may be variation in the bit rate output from the camera because this mode ignores bit rate.
H.264 Quality this field allows configuration of the H.264 image quality setting for variable bit rate control. Setting a lower value results in lower image quality, higher value results in higher image quality.
Enable Rate Limit this button enables variable bit rate control to function like the constant bit rate control when bit rate rises above the level set.
Rate limit allows setting of the rate level.
Constant bit rate control will enable constant bit rate control option. The camera will automatically adjust compression to keep bit rate at the level set.
Bitrate this numeric field allows setting the bit rate for constant bit rate control.
Frames per second: allows setting a frame rate for the camera video stream. Reducing the frame rate is another way to control bandwidth use from the camera; the tradeoff is obvious reduction of video frame rate.
Preview this button will not apply the configured settings to the camera. Clicking this button will modify the H.264 request string based on current settings in the webpage for pasting into a 3rd party media player like VLC. This button essentially just updates the request string to include any changes made by the user since they started the current connection to the camera web page.
Apply this button will apply the configured H.264 settings to the camera for the current web page connection. This button will not save the current settings to camera flash memory. Go to the “Administration” menu and click the “Save to Flash” button to save the current session settings as default for every session until changed or the camera is reset.


